Download and install git.
To check if the PATH is added correctly run git --version in powershell, and it should return something like this:
PS C:\Users\username> git --version
git version 2.34.1.windows.1
The following code will create the new folder work-metas and clone all metasfresh modules from GitHub in it:
mkdir c:/work-metas
cd C:/work-metas
git clone https://github.com/metasfresh/metasfresh
Download and install JDK 8 from AdoptOpenJDK.
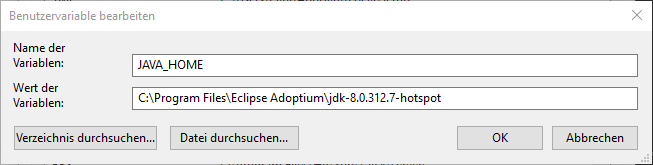
Afterwards ensure the JAVA_HOME PATH is correct.
Download and install node.js
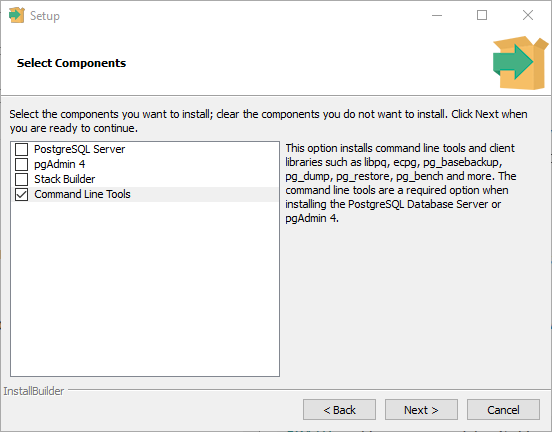
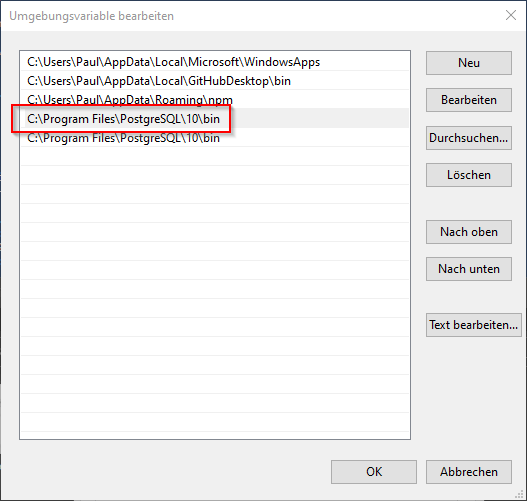
Download and install postgresql (optimal) version 10.19 and only select Command Line Tools.
afterwards add the PATH:
Download the maven binary zip-archive.
Move the extracted files into a new folder named C:/mvn.
Check with C:\mvn\bin\mvn.cmd --version if maven is correctly installed.
This should return something similar to:
PS C:\Users\username> C:\mvn\bin\mvn.cmd --version
Apache Maven 3.8.4 (9b656c72d54e5bacbed989b64718c159fe39b537)
Maven home: C:\mvn
Java version: 1.8.0_312, vendor: Temurin, runtime: C:\Program Files\Eclipse Adoptium\jdk-8.0.312.7-hotspot\jre
Default locale: de_DE, platform encoding: Cp1252
OS name: "windows 10", version: "10.0", arch: "amd64", family: "windows"
settings.xml filesettings.xml file from C:\work-metas\metasfresh\misc\dev-support\maven\settings.xml.m2 in C:/Users/username)settings.xml into C:/Users/username/.m2/settings.xml
Run the following code in powershell:
$start = Date

$env:JAVA_HOME = "C:\Program Files\Eclipse Adoptium\jdk-8.0.312.7-hotspot"
$mvnSettingsFile = "C:\Users\username\.m2\settings.xml"

cd C:\work-metas\metasfresh\misc\parent-pom\
C:\mvn\bin\mvn.cmd -T 2C -DskipTests --settings $mvnSettingsFile clean install

cd C:\work-metas\metasfresh\misc\de-metas-common\
C:\mvn\bin\mvn.cmd -T 2C -DskipTests --settings $mvnSettingsFile clean install

cd C:\work-metas\metasfresh\backend\
C:\mvn\bin\mvn.cmd -T 2C -DskipTests --settings $mvnSettingsFile clean install

echo "Elapsed: "

(Date) - $start
Info: Change your JAVA_HOME and SettingsFile PATH if necessary.
This might take a while to complete. In the end the output should be like this:
Elapsed:


Days              : 0
Hours             : 0
Minutes           : 18
Seconds           : 34
Milliseconds      : 570
Ticks             : 11145705143
TotalDays         : 0,012900121693287
TotalHours        : 0,309602920638889
TotalMinutes      : 18,5761752383333
TotalSeconds      : 1114,5705143
TotalMilliseconds : 1114570,5143
Download and install Docker and follow the instructions to it set up. You may need to restart your computer.
Optional download the Toolbox for additional features such as version or project management. Download and install IDEA Ultimate for additional features.
Since the Ultimate Edition provides additional features for web/spring applications, it is used in this guide. The Community Edition might work, for more information consult https://forum.metasfresh.org/t/development-environment-guide-with-intellij-and-docker-compose/1531.
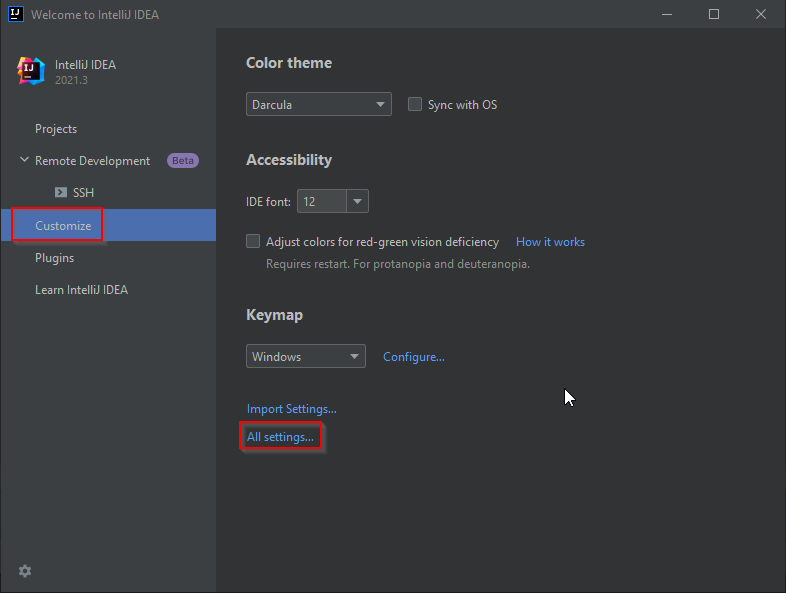
Open IntelliJ Ultimate and go to Customize -> All Settings
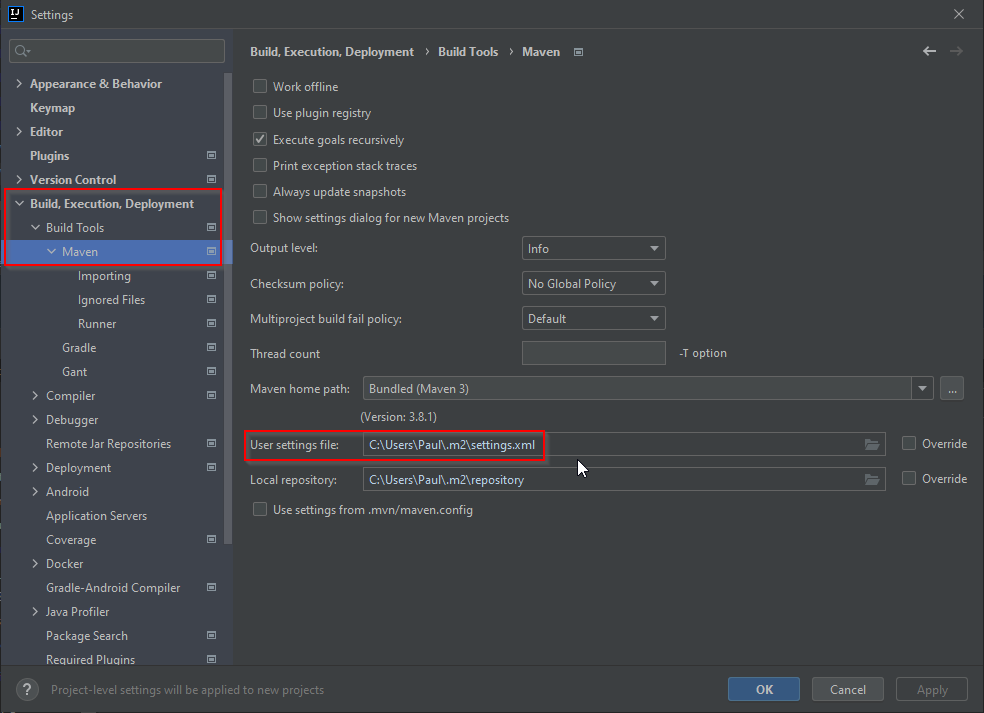
In Build, Execution, Deployment -> Build Tools -> Maven ensure the user settings file path is correct.
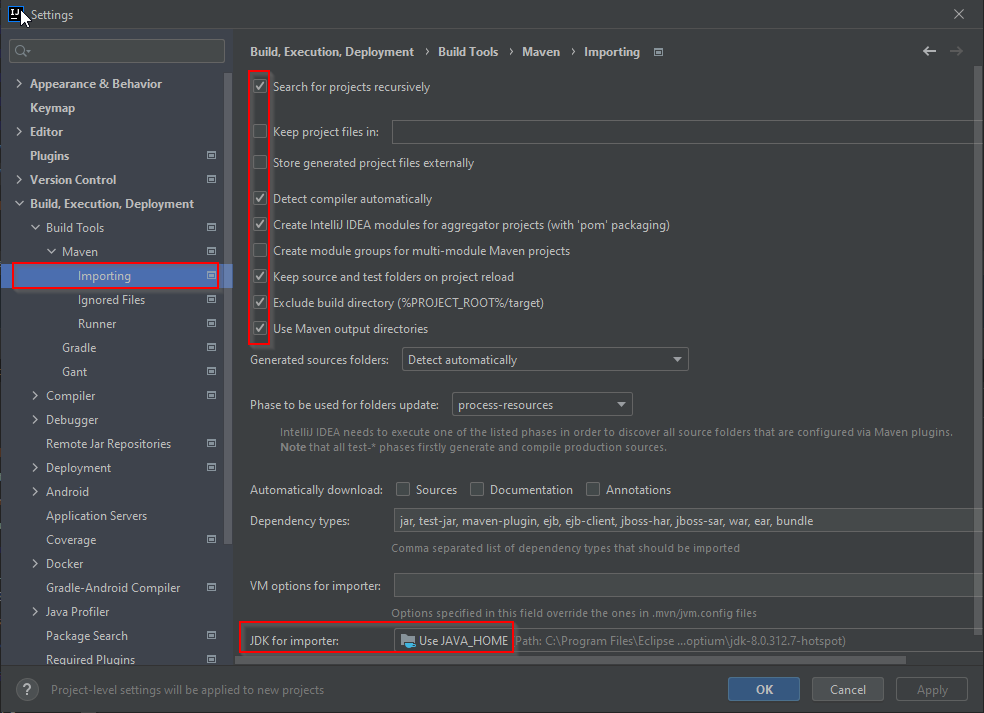
In Build, Execution, Deployment -> Build Tools -> Maven -> Importing ensure the following checkboxes are (un-)ticked:
Also choose the JAVA_HOME PATH in JDK for Importer
Open the work-metas project:
choose Projects -> Open
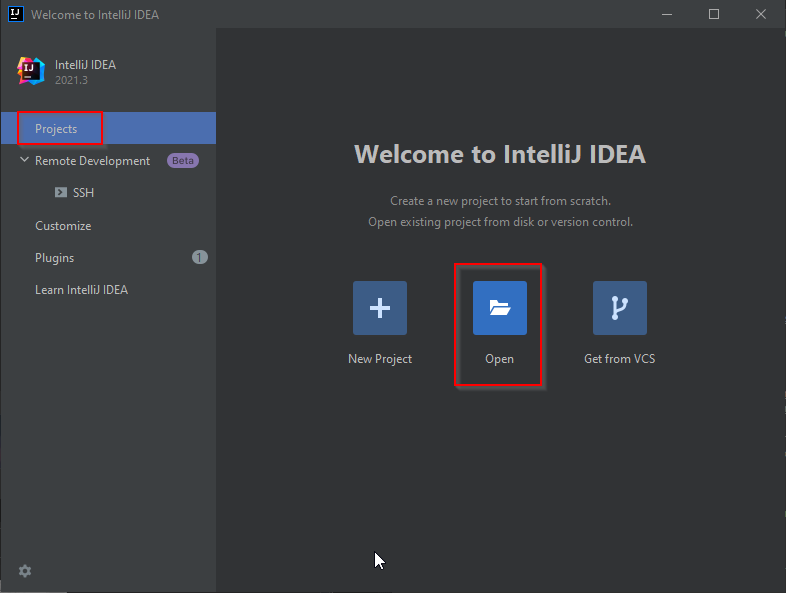
select the folder work-metas

once the project opened, close it again. The work-metas folder should now contain an .idea subfolder.
Copy the .idea folder from C:\work-metas\metasfresh\misc\dev-support\intellij-idea\
into C:\work-metas\.
Copy the metasfresh folder from C:\work-metas\metasfresh\misc\dev-support\application.properties
into C:\work-metas\
Open the project again (see here) After opening the project IntelliJ will show multiple notifications in the bottom right corner. You should accept the following ones:
Open Project Structure with Ctrl+Alt+Shift+S
SDK the correct jdk home path is selected.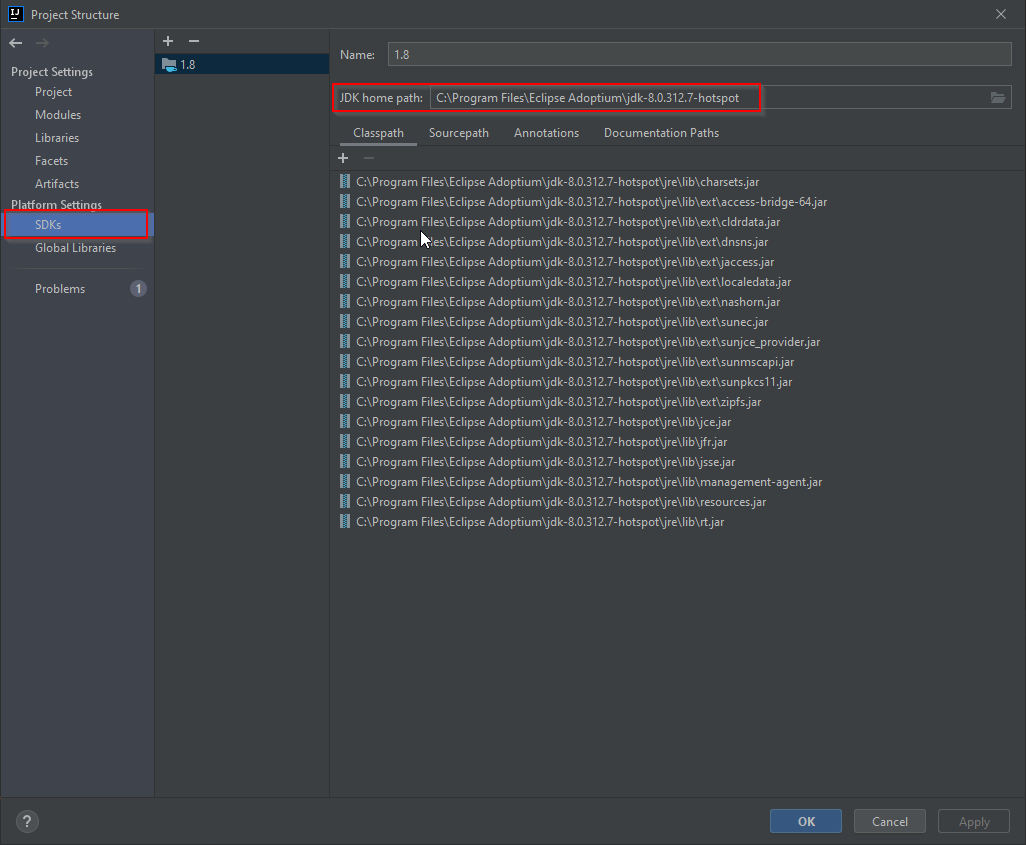
Project choose the correct Project SDK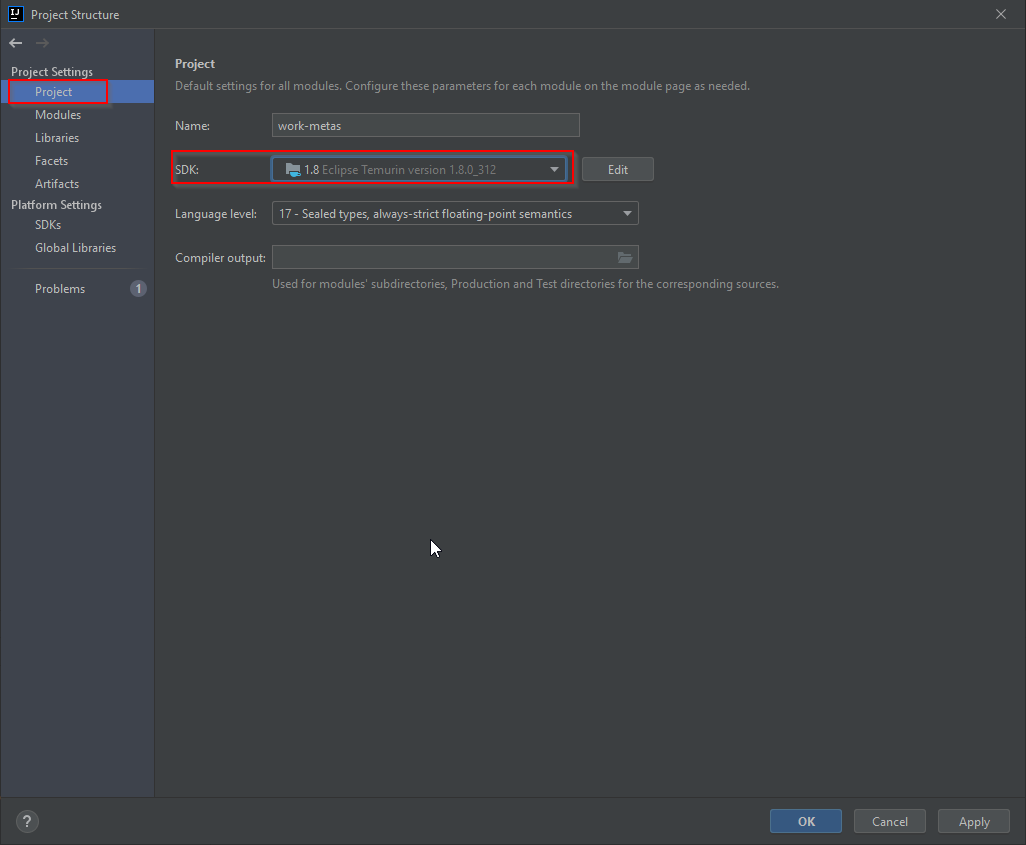
Apply and OKOpen Settings with Ctrl+Alt+S
In Build, Execution, Deployment -> Build Tools -> Maven -> Importing select the JDK for JDK for importer.

In the Project tool window navigate to metasfresh/backend/pom.xml, right-click on the pom.xml and select Add as a Maven project.
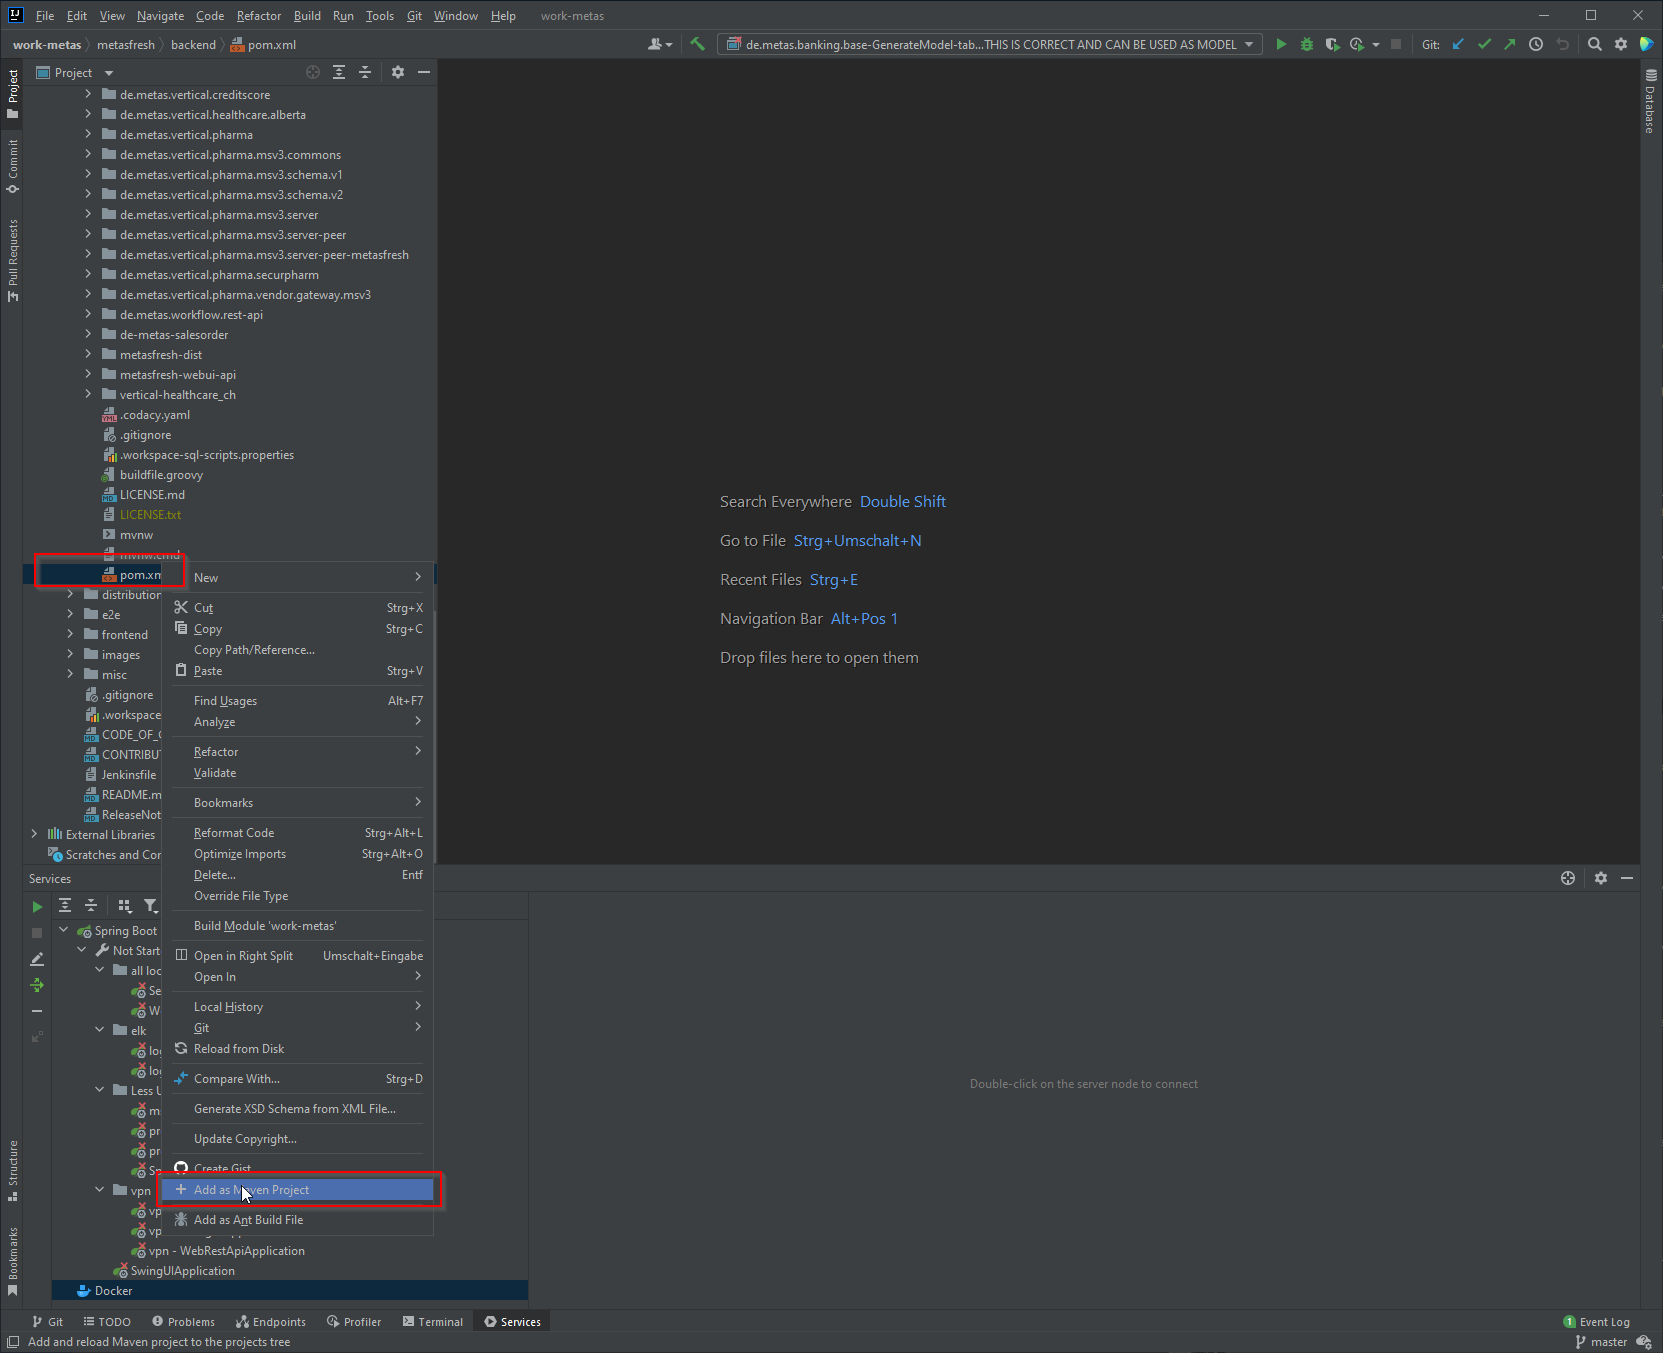
This step might take some time to complete and will throw an error, since we need to add these poms as well:
(In case being asked to Download pre-built shared indexes choose Always download)
Press “4 squares” and disable Configuration -> Type
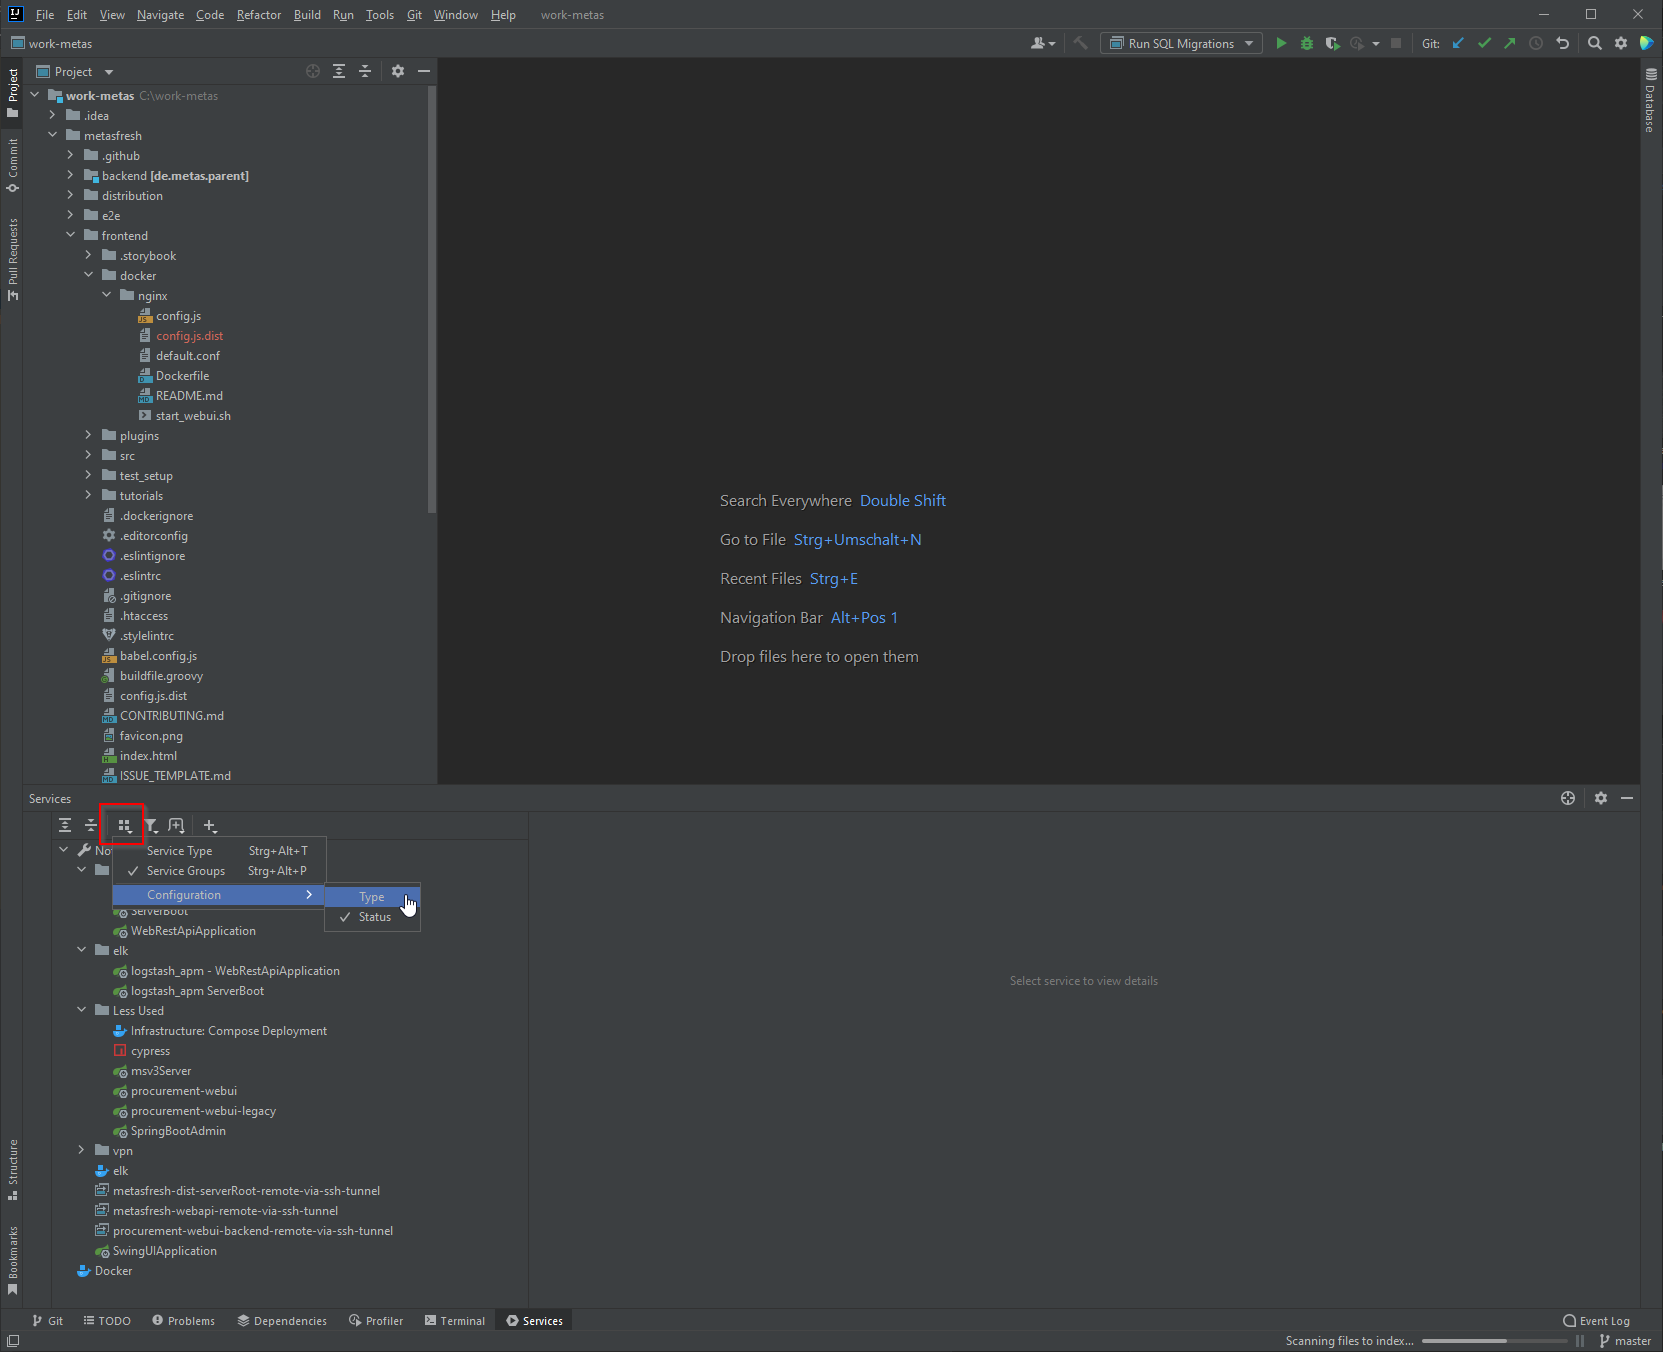
Press “plus”, choose Run configuration type and add the following:
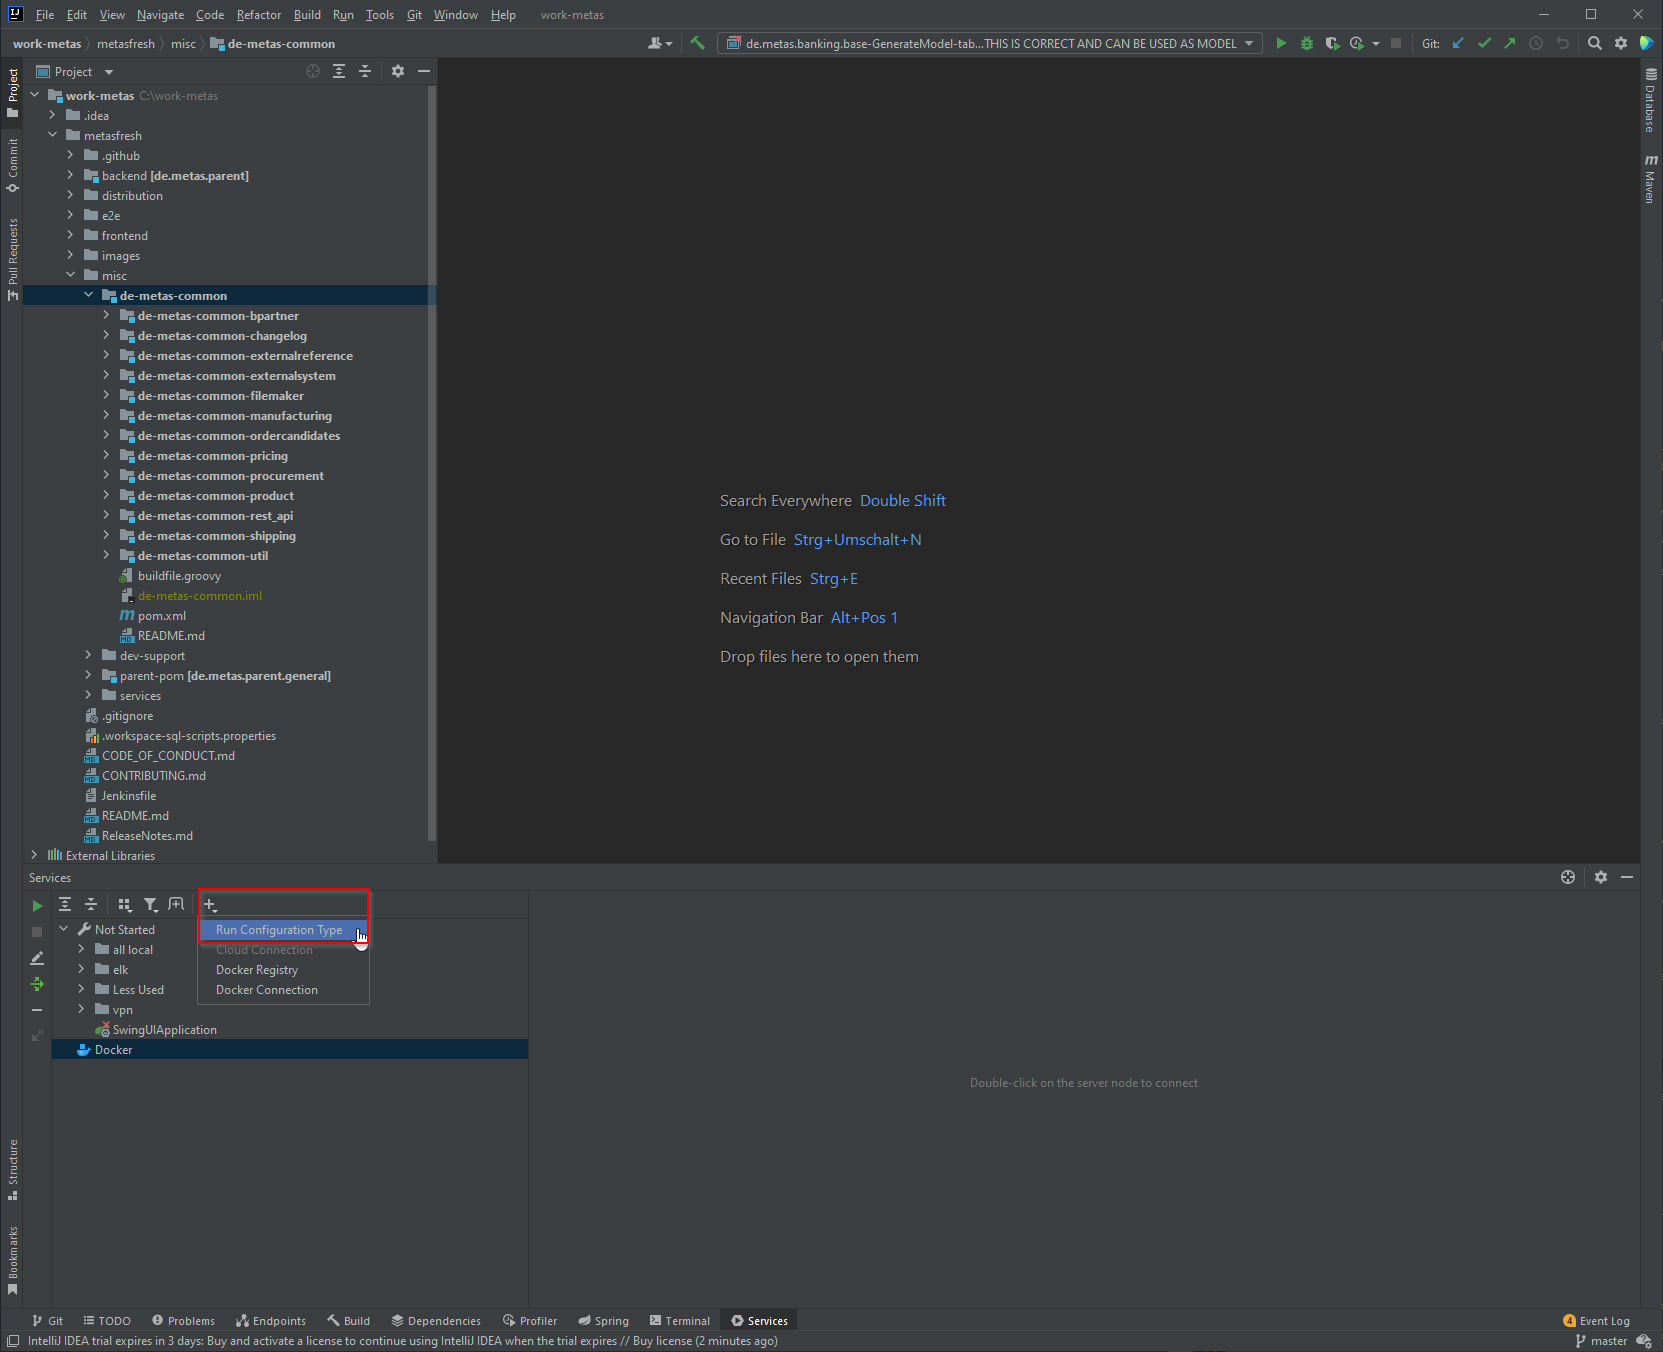
DockernpmRemote JVM DebugIn the end you should see the following Run configurations:
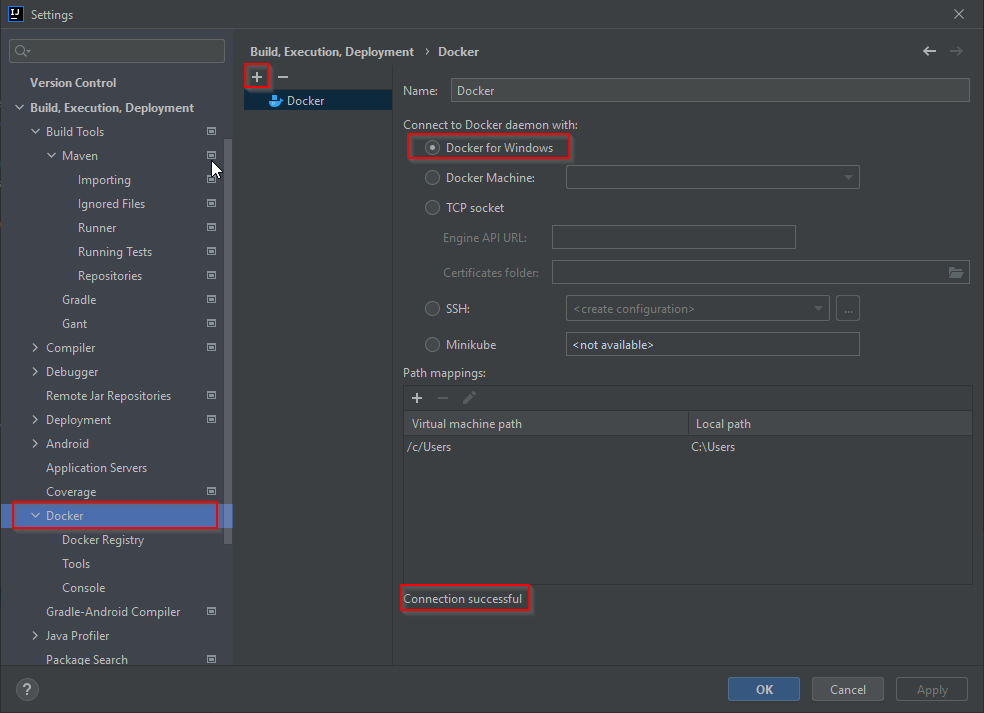
Open settings with Ctrl+Alt+S
In Build, Execution, Deployment -> Docker press +.
Then choose the option “Docker for Windows”. Afterwards you can check if the connection was successful and hit Apply.
Open settings with Ctrl+Alt+S
In Language & Frameworks -> Node.js ensure that Node interpreter and Package Manager are the installed ones.
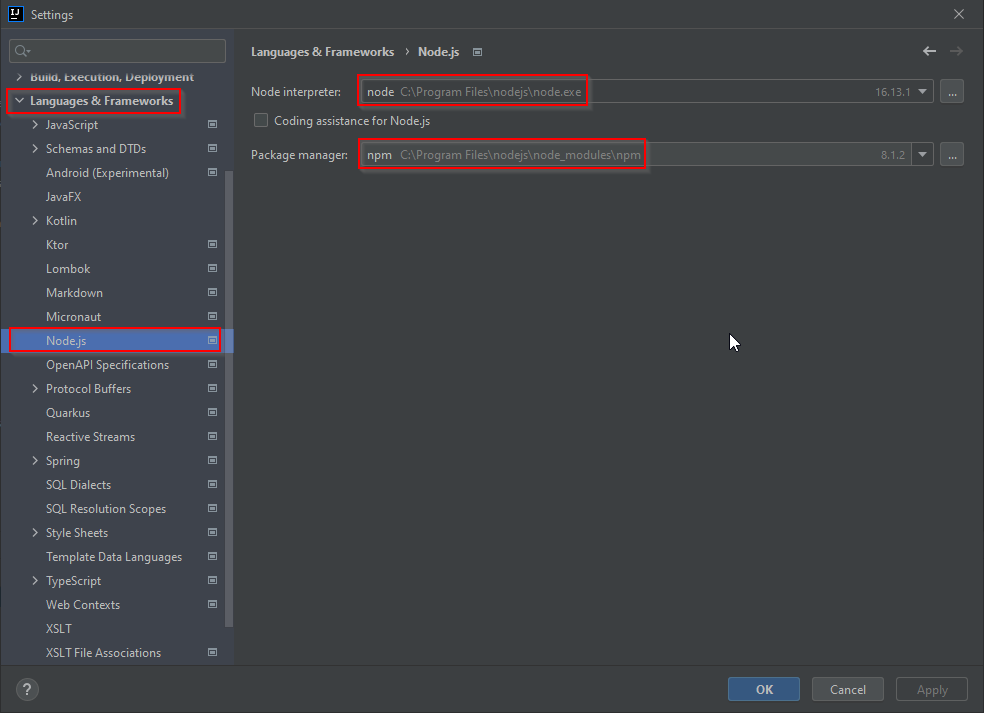
Press Apply and Ok
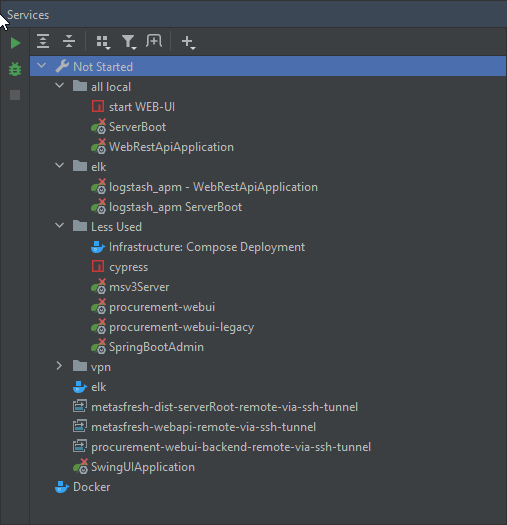
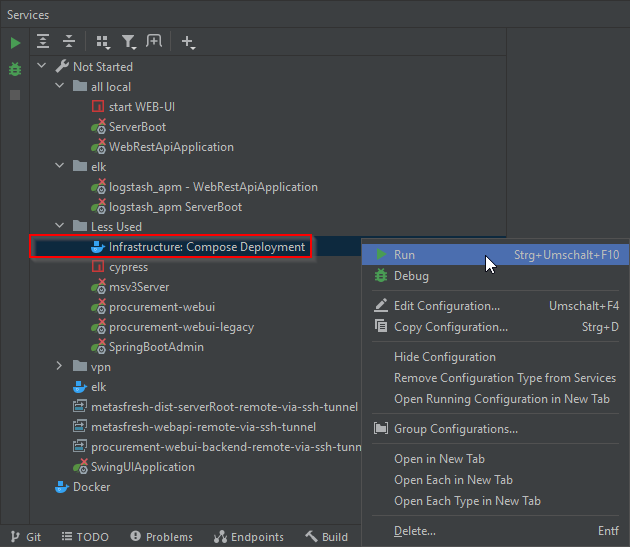
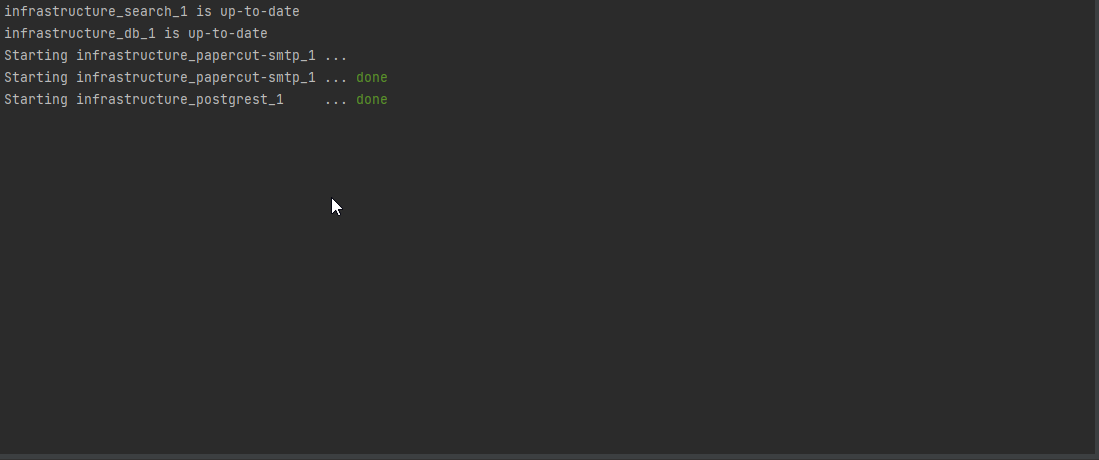
In the Services tool window right click Infrastructure: Compose Deployment and choose run. In the end a message should indicate its success.
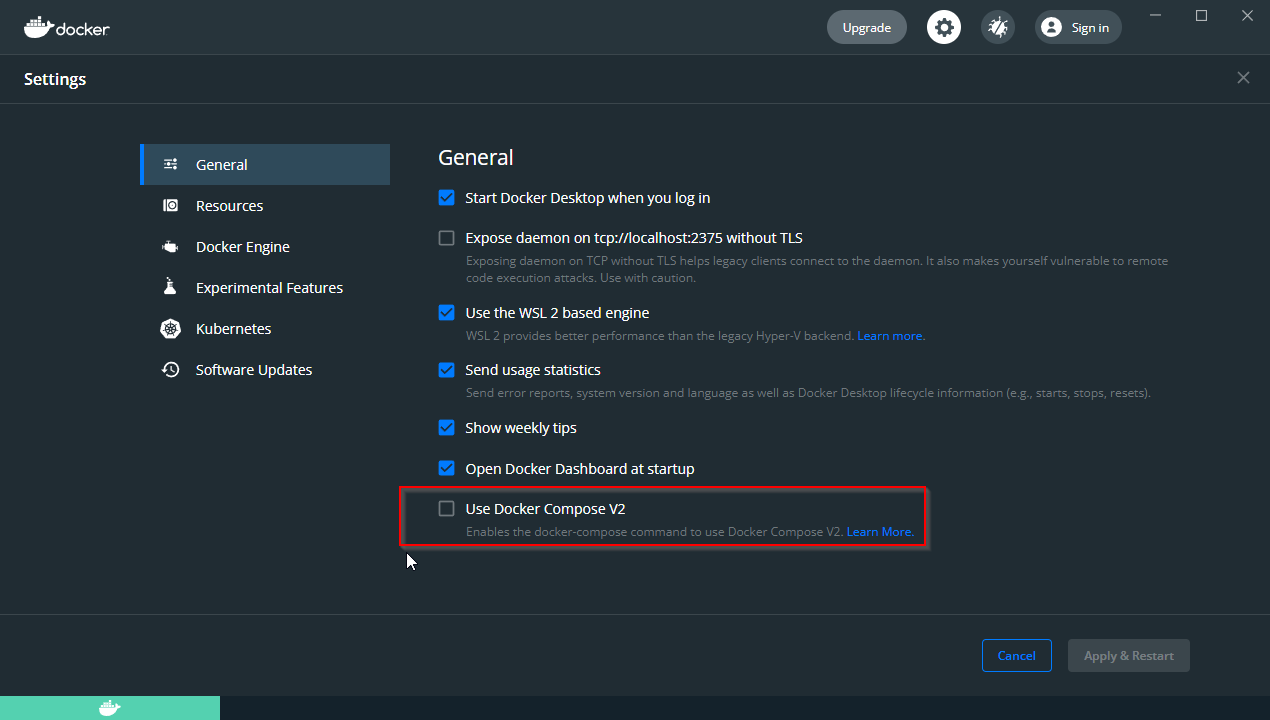
Info about the Docker Additional property error: Docker sometimes enables the option to use Docker Compose V2. However, this needs to be disabled.
In the Project tool window select the file metasfresh/frontend/package.json, right click it and choose run 'npm install'.

Copy the file metasfresh\frontend\config.js.dist into metasfresh\frontend\docker\nginx.
Ask the metasfresh team for the after_import.sql file. This allows you to develop on metasfresh and create valid migration scripts. You need to run this script manually (e.g. in Datagrip).
This is necessary after every git pull from master. It updates all changes to your local database.

In the Services tool window right-click the folder all local and select run. 2 Java classes and the frontend should start.
This should cover the basic installation process.
Use Eclipser plugin
There are some eclipse launcher files in the project. You could install eclipser plugin and
convert the files whenever you need them. Just right-click on a “.launch” file and you’ll find the Convert with eclipser option.
Eclipse and IntelliJ IDEA interop
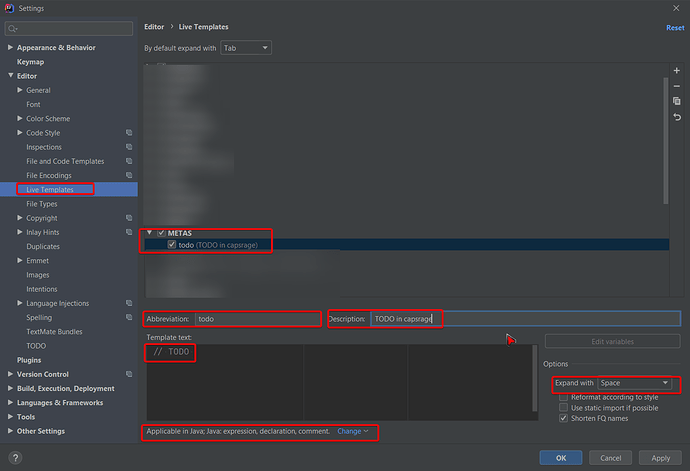
Eclipse can only find // todo comments if todo is in caps rage.
To do this you should go to Settings -> Editor -> Live Templates and add a new template as follows:
Learn shortcuts and helpful information about your IDE.